
Introduction
There are many ad networks from which you can choose in order to start your media buying adventure.
They all promise the best performance, good segments and easy-to-use tools for you to boost your revenues.
Ero-Advertising is one of them.
It’s a platform founded in 2006 and it claims to serve more than 200 countries around the world, helping you achieve your business goals.
Now, let’s see how you can start making cash with them.
Overlook
The interface and the options available on the platform are very user-friendly and intuitive.
Both the transparency of the statistics and the ease with which you can create a campaign make it simple to explore.
As a result, experienced media buyers can fit quickly and find their gold mine.
Moreover, the platform is affordable for beginners, inasmuch as you only need to pay 50€ to open an account.
Campaigns
As per usual, we have the general campaign types:
CPM campaigns – where you can buy the spot directly from the publisher (Go to Marketplace tab and search the website you want or you can simply select a specific AdZone to buy traffic directly on your stats).
RON campaigns – where your ads will be displayed on all of the network’s websites.
Flat rate – where you pay a fixed fee for a space on a website for a given time period.
However, bear in mind that you’re paying for something that may have different or unstable performances during this time.
These types are also the three different inventories where you should search for your campaigns.
Unfortunately, (or not?) you won’t be able to have them all in one place.
How to Create a Campaign on Ero-Advertising?
It’s really easy. Just select the type you want and follow the instructions.
I strongly recommend you use the ‘advanced’ mode which will allow you to better adjust your targeting.
There’s also a handy accessory that allows you to categorize your campaigns, for example by regions.
It keeps your inventory both more organized and more transparent.
This will come in handy whenever you need to analyze it.
Once created, you’ll spot your campaign on the list as shown below:

The buttons on the right side of the name are everything you need to prepare it before running, in the following order:
Activate / Edit / Add ad / Delete
The targeting options will only be displayed while you create your campaign.
For you to find them later on and edit just use the Edit tab.
Targeting
Here, you won’t find any complex or innovative tools while targeting your campaign.
Even so, as I usually say, the simpler the better.
Simplicity really does apply to everything in life, mark my words.
The platform provides a lot of targeting choices!
Ranking Type
Select the traffic type you wanna go for.
There are 4 available traffic types on Ero-Advertising:
Bikini Style, Softcore, Hardcore, and Extreme.
If you pick one type of traffic, you should expect to get that type.
In case you select Hardcore, you’ll get traffic from all Hardcore and Extreme sources.
Frequency Capping
From 1:2 up to no capping at all.
Payment Type
You can opt for SmartCPM and CPC.
Dayparting
Add the time periods and the days of the week in which you want your ad to be displayed.
Daily Budget
It’s always useful for you to set this!
Country
You know what to do here.
Regions
Pick the region you wanna target.
Provinces
Select the specific province you wanna target.
Traffic Type
You can go for desktop or mobile.
Operating Systems
Choose from a range of the most popular operating systems, including the two big players – Android and iOS.
Browser Languages
Select the language of the specific browser.
Categories
Go for the category you want.
Adzone Ranking
This recent feature allows you to select the traffic quality you want.
You can go for low, medium, good, or premium.
And there are some other extra filters if you need them.
One of the most important things for a media buyer is carrier targeting.
On EroAds you can target your campaign by operators (Wi-Fi or 3g).
Both the website and browser languages are very practical features.
For example, you may choose to display your ads to French users only.
It might be recommended when you work on the details of your banners, attempting to adapt them to the recipients.
If you limit the receiver only to Francophones and implement well-made French banners – limiting you traffic at the same time – you may be doing something that helps you get a higher conversion rate.
It’s impossible to check the costs per Browser, OS or Language on the platform.
Nonetheless, if you really need to track this, you can either split your campaigns or use a tracking platform.
Think you need help with the technical jargon that makes your head spin?
No biggie!
Banners
It’s time to upload some profit-attracting, dazzling banners!
One of my favorites on this platform is a time-saving multiple upload option which allows you to select up to 10 banners at once.
However, you may prefer to give each banner a different, specific name.
In order to do this, you can use a one-by-one button.
There’s a whole lot of different sizes.
That diversity can make you feel excited because you think about all the spots you want to profit with.
But wait!
Not so fast!
The majority of these sizes won’t even receive any traffic (you can check a small box on your right to get an estimate of the number of views you may get).
The fact that most of these sizes won’t bring you any traffic is the reason why I have a relevant recommendation:
Start exploring the most popular banners and, after you become a bit more experienced, explore the rest.

Even though other banner settings seem familiar, the ‘Display URL’ box might be confusing.
This is what appears on the banner, in a small-sized font, while the user sees it.
My tip would be to use a bunch of appealing URL addresses.
Bear in mind that you have to adapt to each region in order to get more conversions.
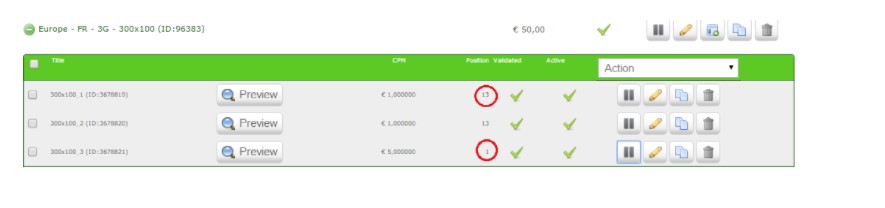
Bid
If you wish to drive the traffic differently depending on a concrete ad, Ero-ads meets your demands and comes up with a solution allowing you to set a different bid for each ad you have and showing your current position.
Statistics
Once your campaign is created and you’ve started making some money it’s time to optimize and make the best of it!
Checking the stats will give you the info about campaign and banner performance for a chosen period and interval.
For a quicker post search, you can also filter by group from the dropdown list of campaigns.
However, if you want to check details per campaign, you’ll see two options to your right:
“Country Stats” and “More Options” which will allow you to analyze details per campaigns, adzones or domains.
Once this is done, you can check data per website: click on the views amount and you can see website and Adzone details where you can create a white list or blacklist filter at the same time.
But here’s a trick. While the websites are excluded at the moment in which you add them to the domain filter (blacklist), you actually need to update the white list filter in the edit section of the campaign and save.
Otherwise, it will continue running as RON and I deeply doubt anyone wants to be unpleasantly surprised whilst checking your performance next time.
Let The Games Begin
To summarize, Ero-Advertising is a great platform to start working with and choosing between the wide range of geos.
It provides everything you need to optimize and change the course of your campaigns.
Do not be afraid to try different bids and always make sure you play according to the rules and banners restrictions of offers, partners and operators.
I hope this article gave you the encouragement you needed to try this less-known ad network and find your niche.
If you have any questions just contact me and I’ll help you become a real money-maker!
Good luck to all!
See Also:
- How to Create a Campaign on Ero-Advertising
- How to Optimize Campaigns on Ero-Advertising
- How to Create CPM Campaigns on Ero-Advertising


AdvertisementStill struggling to find the best offers because you know you wanna make money faster like a real master? Lost…
It's finally time for you to learn how to create a profitable campaign on Ero-Advertising, one of the world's most important ad networks!

Traffic Factory is one of the most popular ad networks around. Learn everything about it by checking this Mobidea Academy post!